Wednesday, January 31, 2007

Digital Workflow (Part 1) - Appendix

Sycamore Gap, Hadrian's Wall, UK - Image © David Toyne
I've added some additional links to support the article: Digital Workflow (Part 1) they should assist you if you decide to follow any of the advice in the article.

Some tutorials for using Capture One are available on their support page at Phase One's website. I'm a huge fan of this products ease of use and end result as you may have gathered.

Tutorials for using Adobe Bridge are available as a video tutorial on Radiant Vista. I like the Radiant Vista tutorials very much. I find video demo's a great way to hit the ground running when learning new software.

Two other workflow enhancing tools to organise images and keyword that I neglected in the article are:

AcidSee Pro - Easy to use and very flexible and feature rich. It has slowed a lot with .tif files when they are in the 100's of Megabytes when I tested it out. This doesn't affect most people of course but heavy photoshop users and people who get above 8MPixels and 4 layers at 16 bit also need to try it out and see if its okay on your machine.
Extensis Portfollio - Superbly fast program to organise and catalogue all your media files including files on offline drives or CD/DVD backups that are not loaded on your computer. It's only drawback is the price is a little steep. Other than that its a fast and solid product.

Thursday, January 25, 2007

Digital Workflow (Part 1) - Organising Your Files

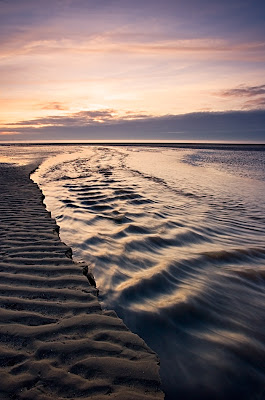
Crosby Beach Inlet - Image © David Toyne I'm now less than a day away from my annual trip with my photography friends. As always each year I'm very excited and currently counting down the hours. I realised that weather permitting I'll generate 1,000 plus digital photograph's in the next four days. This scary thought made me consider digital workflow.

You will soon find that thousands of digital photographs on your PC at random can become a huge headache. Files get lost, impossible to find or damaged. Duplicates are created and space gets wasted. As digital photography is now inside so many homes this has become a real issue for many of us. In the past we may have had physical photograph albums and negatives, where as now we have a hard drive. Our eggs are now all in one basket and it has become a worry. You could easily loose a precious image of great sentimental value. Perhaps something you can't ever replace? Worse case you could loose all your photographs in their entirety. If you're a pro or semi pro this could also have severe financial implications and affect your reputation and future business.

In this series of articles I'll cover how to organise your digital photographs, how to back them up and archive them and I'll also cover the image processing essentials to get from your original digital pictures to the best quality print you can manage. We'll start with what to do with your files before you even start work on them.

For the purposes of this exercise we'll assume you have taken your pictures. You are comfortably sat at your PC with your memory card clutched in your hand or your camera in it's docking station. The next thing you need to do is organise those files on the PC.

Preparing a place to store your images

Step 1 - When copying the files from the camera card or the camera itself copy them into one central folder. This folder should be where you keep all of your images. This makes backups easier to setup as you simply remember to backup one main folder.
Step 2 - A good plan after step 1 is to create sub-folders named by year and then under these sub-folders create a folder for each group of shots you take. Name the shots by using a date coupled with meaningful names. Use these folders to organise your files in. A good format of folder name is yyyy-mm-dd-{Photo Name}.
Step 3 - In each sub folder have a folder named 'developed' or similar in which to save you processed images. Never overwrite the original unprocessed image files in case you damage them. Always work on the copies of your originals in the developed image folder. Saving them in a separate location like this helps instill the discipline of not using your original files. Your final file path for images may be something like:

PictureArchive\2007\2007-01-29-HadriansWall\Develops\{file names}

All your files can easily be batch renamed within this central folder. This can be done with programs like Irfanview image viewer.

Irfanview Thumbnail Viewer
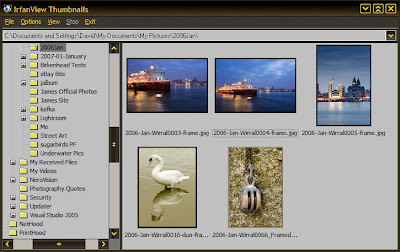
Irfanview thumbnail screenshot

can batch rename files and allow easy and rapid viewing of thumbnails. Best of all this is totally free though a donation to the author is an option well worth taking with this excellent program.


The finished file location
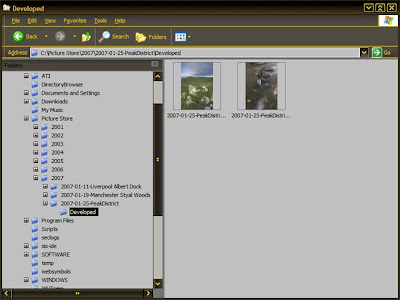

screenshot of image folder structure

Keywording your Images:
This used to be something of a bugbear. The software was expensive and unreliable but nowadays this task can be easily and quickly accomplished with a variety of cheap and cheerful software. First a little on what keywords are and why you want to use them.

Your files all contain 'meta data'. This is simply a part of the file which holds information about the file itself. In the case of your .mp3 player we're all already familiar with it as this is the part of the file that contains the artist name, track name, album title etc... We see it scroll on by as we listen to our favourite tune. In the case of picture files there is similar information available. You can, for instance, add the photographers name to a picture file. You can also add a description, title, copyright notice and camera information.

Most useful is the ability to add keywords. I'll explain myself. If you have a portrait of a monkey called John and keyword it with the words 'portraits, monkey, John'. What happens later in life when you have 20,000 pictures on your hard drive and need to find the picture file in a hurry? With keywords you can search for files containing the meta data 'portrait, monkey, john' and find your file instantly. As opposed to searching through years and years of files at random. Keywording takes minutes to do when saving your files from the camera and will constantly save you hours of stress in the future.

There are many tools to add meta data to batches of images. If money is an issue and performance is not then Microsoft do a very good tool for metadata editing.

Metadata editor screenshot
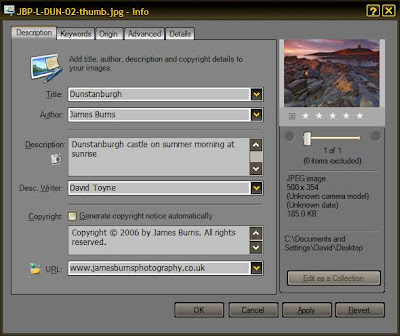
Microsoft Metadata editor screenshot

Microsoft also do an add on RAW file viewer to show RAW files as thumbnails. When used in addition to the meta data editor this is a very useful free solution.

There are also solutions to copy your files to a location on your hard drive. Batch rename them and add keywords and details all within one program. The ones that spring to mind are Adobe Bridge, Capture One LE/Pro and Adobe Lightroom.

Capture One Pro or LE is a program designed to import and process RAW images as a batch it is also able to keyword and rename files. It's RAW processing abilities are second to none in my opinion. I'll cover its use in a separate tutorial at a later date.

Capture One Screenshot
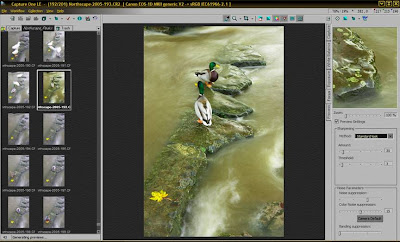

Capture One screenshot
Adobe Photoshop comes with the program Adobe Bridge which allows you to browse all your files as thumbnails, batch rename them, add metadata and keywords and also to send them directly to other programs to edit such as Adobe Photoshop or Adobe Imageready.

Adobe Bridge Screenshot
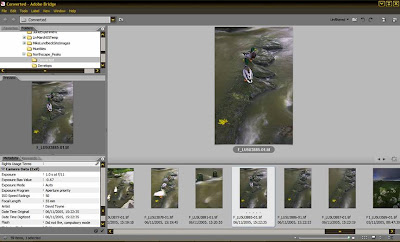
Adobe Bridge screenshot
So at the end of this first article you should have a good idea of programs to use to organise and categorise your images. If you follow the advice in the article you should also have all your images stored in a manner where they can be easily found. No longer will questions about 'Where did I put that image of the cathedral in Liverpool I photographed in April last year?' be an issue. It'll be in the 2006\April\ folder and you can search for the keywords 'buildings, cathedral, Liverpool'. What was a stress is suddenly transformed into satisfaction.

Next time we'll look at back-up strategies to stop you loosing your images.

Tuesday, January 23, 2007

Portrait Photography - Useful Information

Sir Frederick Funkeldink Today I have the mental weakness of thinking in straight lines. This means I must follow yesterday's useful information on landscape photography with resources for portrait photography. As I've stated previously a lot of portrait photography is about your rapport with your subject and their trust of your ability to represent them. This means a portion of these links are a little less specific. I'll start with two portrait photographers of note worth looking at for differing reasons.

Arnold Newman - One of the great masters of the photographic portrait. His work is worth looking at for its great use of space and his ability to use the environment to tell you something about his subject. It's also obvious how great his relationship with his subjects is.
Hellen Van Meene - Renowned Nederland's photographer. Uses natural light and props/costume to produce stunning and original portraits with a very unusual and original feel to them. A great photographer to study for her use of light and colour in an image. Sadly the web can't do justice to how wonderful her prints are in reality.

The next two links are more technically useful with some information you can use directly either for ideas or to improve your technique and ability. This has the side effect of making your subject more relaxed as you'll be working fast and with confidence so they don't have time to panic or doubt your ability.

DG28.COM - This site is the brainchild of Neil Turner. Neil has been a freelancer and then a staff photographer for the Times Educational Supplement. He's a master of his craft and has great lighting and improvisational skills. I think they've been developed by hard work and the need to cope under the pressure of his job. On his website he generously shares his experience, tips and skills to give you great insight and inspiration as to what you can achieve in a portrait.
Planet Neil - A site made by Neil van Niekerk with a splendid tutorial on flash lighting. It is the best tutorial on this tricky subject that I've read anywhere. It's accessible easy to follow and superbly readable. It puts mastering flash and controlling light into the reach of anyone with a flashgun. As available light will not always suffice this is an essential read.

A couple of good books to read on the subject of portrait photography are:

Lighting For Portraits - By Steve Bavister. - A well illustrated and well written book covering the simple lighting for portraits right up to very complex studio setups with examples and diagrams of each style.
Portraits - By Steve McCurry. - A book of nothing but portraits by this most splendid of photographers. Pay attention to his use of colour and background. He reminds me of a rennaisance painter.

Monday, January 22, 2007

Landscape Photography - Useful Information

Dunstanburgh Castle - Image © James Burns

Once again I prepare for a long weekend of looking out at rain out a cottage window instead of taking landscape photographs. This got me to thinking about landscape photography for a while. I wondered what sites and information would be useful to photographers starting out with landscape photography. On the web there is a glut of information out there but I find I always return to the same handful of sites. With that in mind I thought I would list them here with a brief description.


The Luminous Landscape - The brainchild of the very talented Michael Reichmann. This frequently updated site contains articles on photographic equipment, printing, workflow and varied creative advice. The articles range from the very technical to clear and concise advice. The site has something at the right level for everyone.

Northscape - The creation of seasoned photographers Keith Henson and Andy Dippie. They run superb landscape courses all year round. I can highly recommend these courses as I have done one myself and learned more in 3 days than I could have taught myself in a year. They have also recently started master classes. More to follow on them soon.

Radiant Vista - In Digital photography and with scanned film photography also, the post processing of your images vital. It is often the diference between a stunning landscape and a mediocre shot. Radiant Vista has some excellent video tutorials to set you on the right track to produce shots that really stand out from the crowd.

ePhotozine.com - Is a great web community for photographers of any ability. Ask a question and it'll be answered quickly and in a useful way. The site is crammed with people in the know on just about any landscape topic you need. There are also some well known professionals melingering on ePhotozine offering the benefit of their experience to beginners and enthusiasts.

Charlie Waite - The grand master of landscape photography. I recommend studying his images to help collect your own thoughts on landscape. He also gets involved protecting the landscape he loves rather than just being a tourist which I find admirable.

Joe Cornish - It was after first seeing the work of Joe Cornish I decided I wanted to be a photographer. Sadly I have the wrong temperament for landscape. However I greatly admire those who do landscape well like Joe. He's a really friendly, approachable and articulate person with very clear views on art and photography that show in his work. He does great courses which really make you slow down and think about what you're doing. Joe teaches you how to recognise what works in landscape and why it works. Once again this is not a random recommendation. I did a course with Joe and Dave Ward Two years back and loved every minute.

David Ward - Has a very unique abstract style all of his own. He also has a highly intelligent outlook on his work. He's the philosopher king of landscape photography and his book The Landscape Within is on the reading list of many skilled photographers I know.


Note: I'd also like to thank landscape photographer James Burns(*) for the beautiful image of Dunstanburgh used to illustrate this article. You can purchase prints from James or hire him for commissions, training etc... at his website.


* As with all landscapers don't feed him after midnight and keep him away from direct sunlight.

Saturday, January 20, 2007

Portrait Photography (Part 1)

Maria in repose - Image © David Toyne A friend of mine told me when I started out on my photographic journey that portraits are the greatest challenge in photography. I was puzzled by this statement at the time. As at the time I thinking in purely technical terms about photography. I was struggling with all photography not just portraits.

When I asked for clarification and she said something to me that I have never forgoten since. She said 'unless you can connect with the person and draw out who they are. Unless they trust and like you. Then your picture will be of a reflection of their discomfort at the situation and their distrust of you'. The obvious thought at this statement is that you do not want the picture that this situation would create!

When I asked what I should do to avoid this situation she said at the time what seemed the strangest thing. My friend answered 'you must take a slow portrait...'. At the time I was quite baffled by this most enigmatic of statements. However with the benefit of a few years hindsight I shall attempt to elaborate what I believe was meant.

There are technical aspects of portrait photography it would be foolish to pass over. Light is critical. The way it interacts with your subject should be ignored only at your peril. Lit from below your subject will look like Frankenstein. Lit harshly from above unflattering shadows will dominate the shot. Hair is naturally dull on camera unless you can get some soft light into play on it then it will take on a whole new dimension. A lens of 85mm is a great focal length for a flattering shot it will not distort the subject. Take care of plants growing out peoples heads, pay attention to your background. Don't be afraid to fill the frame.

All this is useful to learn and all these rules can also overwhelm you when starting out. It can easily be learned by rote from any photography textbook. Though that will not guarantee a good result. It also does not answer what was meant by a slow portrait? How do you take a slow portrait and what will be the resulting benefit?

I will attempt to explain by relating a true story. I was at the wedding of a photographer friend of mine in the happy capacity of his best man. It was during this time I finally realised what a slow portrait was. It was also then that I took my very first slow portrait of note. This was the picture of the wonderful lady pictured here. He name is Maria and she was the grandmother of the groom. She is without a doubt an awkward subject who dislikes her picture taken so much that she cuts herself out of family photographs. To be fair we all know people who dislike thair picture being taken so she is not unusual in that respect. That said Maria is a challenge to photograph even going by this standard.

I asked to take her picture during dinner and was politely declined without hesitation. My status as best man carried less weight than that of the official weding photographer who also received the cold shoulder. However I was by then determined to photograph this distinguished lady. When I had the chance I spent 45 minutes talking with her. During this time she relaxed, warmed to me and finally she began to speak about seeing her grandson married. This made her think about meeting and falling in love with her husband. This was the start of a wonderful and heart warming moment that I still smile when I recall. I took the picture shown at the moment she related to me first laying eyes on the man who became her husband when she was still a teenager. Her expression became wistful and she gestured with her hand as she spoke. I insisted that I must take her picture as she recalled her husband as she was radiant in that moment and anyone could not fail to see this. When stated like this she warmed to the idea of a picture and agreed to the photograph being taken. The result is more than a simple photograph in my opinion. It is the portrait of the person as she seemed to me in that moment in time. A time capsule.

I've used a touch of fill flash. The wide aperture of f/2.0 has made the background less distracting. The candles on the table have softened or removed entirely any unflattering shadows. These are all technical and to a certain extent ephemeral things. The main thing is that I spent time getting to know Maria. I gained her trust and her confidence. When I finally took a picture we where on the same wavelength and I had her trust in my intent as a photographer. This is all reflected in the resultant image. It shows the wonderful person I saw. It is not simply a snapshot or recorder shot of a stranger that will mean nothing to anyone else. It is an image with more intrinsic value than that. I'd also say that at 45 minutes it was indeed a very slow portrait. This is what is meant by a slow portrait. One that takes the time to connect with the subject and draw out the best in them because they trust you to do that.

So when taking a portrait remember the technical rules by all means. Remember though you forget the person and your bond with them at the cost of a worthwhile portrait. When given a great opportunity like Maria gave me don't be so obsessed with appertures and shutter speeds that you don't see the golden opportunity in front of your face. Be engaged with the person and the personality you want to photograph. Remember this and you will not fail. Your portraits will always be greater than the sum of their parts

(Warmest thanks to Magda Indigo for all her advice and wonderful exampleson of portraits over the last few years.)

Friday, January 19, 2007

Appreciating Photography

Just a quick note to say professional photographer Paul Indigo posted a rather nice article on appreciating photography. It can be found in Paul's January 15th blog. I certainly think its worth a read.

Tuesday, January 16, 2007

Photography: The big secret (Part 3)

The Angel Inn - Image © Berny Howden
In Part 1 and Part 2 of this series of articles I illustrated the use of words to generate an emotional response to an image and also using words to fix or alter the context of an image. I'm going to end the series on words in images with several images each using words as a visual device in very different ways. I'll discuss why and how I think they work.

The first image of the Angel Inn works on multiple levels. The interaction between the word 'Angel' and the glowing white of the building. The fact it's an oasis in the middle of a desolate decaying landscape. To me an almost subliminal message is the inference that this is a shrine to alcohol, seeming to be offering drink as a form of hope or salvation in a hopeless place. It lead me to wonder at what cost? So I felt it seems a nostalgic image but one with a very modern and pertinent message none the less.

Chaos - Image © Berny Howden

The next image 'Chaos' is of a young boy and is an exemplary example of the use of words to create a strong emotional response in the observer. It's also a great piece of social photography. I can't give a concrete definition of the meaning of words in this image and that is part of its appeal to me. The reference to Chaos asks more questions than it answers. Does he cause chaos? Is he in turmoil? Why did the photographer choose to position the boy this way? Even simple things like is it his picture? Or what is he saying? Consequently this is a photo I've come back to time and time again. The single word 'Chaos' and its effect on the images context is a large part of the reason. So once again a great example of the power of one little word. If I am lucky perhaps Berny Howden who took the above two photographs will comment and shed some light on this most enigmatic of photos.

Cancer - Image © David Toyne

I took the above image 'Cancer' on a wander around Manchester on a dreary windy day. Landscape was not an option. I found the open dustbin and its grizzly contents an interesting thing to juxtapose with a warning about Cancer. Cancer consumes in a horrible manner and so do we. To this planet we are a cancer. We blank out fear of cancer much like we blank out the thoughts about our own conspicuous waste and consumption. I'm not entirely sure if the image works as some of the connections it makes are not clear to me yet but I do find it morbidly fascinating.

When Shut we've moved - Image © David Toyne

Last but not least a simple bit of fun to show that if you keep your eyes open you can see some hilarious and farcical things written all over the world. People quite accidentally make the most amusing visual jokes all the time. Don't forget to exploit these opportunities to create your own creative work. It's what arts all about.

Creative Training Sign - Image © David Toyne

The last image is just a small afterthought. Words are just symbols with meaning as are arrows, cartoons, graffiti and any number of other visual props. The last image mixes the idea of training with lack of direction using the arrows and words combined. Expressing concepts and feelings using words and symbols can be abstract but also great fun with very rewarding and unexpected results. So get out there and make something unusual and beautiful...

Note: Warmest thanks to Berny Howden for giving me permission to use the first two images in this article. It was a very generous of him to do so. Check out more of his great social photography at the link in the article you'll be glad you did.